Code By Martin

Binary Search

| Comments

Mike Taylor noted in a blog post that in the book Programming Pearls it is mentioned that no more than 10% of developers can correctly implement a binary search. Appalling!

Let’s see if I am in that 10% or not…

As I’ve found myself using Ruby more and more lately, I thought I’d try to implement the binary search using that language.

Here’s my stab:

The script includes code to run the binary search through the test cases for the exercise created by Steve Witham. And once the file reading worked - all tests actually passed (or the code incorrectly shows them as passed… ;).

Good training this!

/M

Migrated to Octopress

| Comments

Like all cool kids blogging nowadays, as part of the attempt to rejuvinate the blog, I’ve switched to Jekyll. Or, rather, the extended fork Octopress.

As part of the migration I wanted to extract all the old posts from Wordpress into the proper markdown format used by Jekyll.

Jekyll includes a migration script for Wordpress, but this used a direct database connection to the Wordpress MySQL server to extract a minimum amount of information for each blog post. To avoid missing information that I later might want after having shut down the Wordpress server, I wanted to base the migration on a full XML export from Wordpress. This way I could go back and extract more information from the old posts, if, and when, needed.

Seeing this as a chance to play with Ruby - a language I’ve only dabbled in previously - I set out to build a simple Wordpress XML->Jekyll converter. The converter reads the Wordpress export and converts all blog posts into separate files with a proper Yaml frontmatter. It also converts the syntax highlighting markup, code markup and headings into the corresponding markdown conventions. The rest of the HTML is left alone.

For the images I just copied the files in the old Wordpress structure into the new blog directory layout so that the URLs still match. Not the nicest way, but I was too lazy to do anything about it just yet.

Anywho - the source for the Wordpress XML converter is available in the blog branch of my fork of Octopress. The source is also given below. To use, just run with the filename of the Wordpress XML export as the first argument.

It’s my first publicly available Ruby program - so be careful. Improvements welcome!

/M

Nginx

| Comments

For that fresh new feeling I switched this site from Apache2 to Nginx. A quick compile of the source package and following the instructions on hooking it up with Wordpress over fastcgi using php-cgi and we’re done!

Feels good with a server handling the C10K problem - and it has a fairly decent configuration language IMHO.

Also looking forward to use Nginx more in the days to come as a the web frontend for development tools server at work hosting, among some things:

  • Gitorious
  • Redmine
  • Hudson
  • Nexus

Will post more about this later!

/M

New Direction?

| Comments

More than a full year since last post - this might not be working as well as I had hoped…!

Finding the time and inspiration to write between the day job and private commitments turns out to be a challenge. Instead of seeing this as a failure, however, I will try to learn from the experience and attempt to find a new way of relating to the blog. Perhaps by being less long winded (!) in each post I could get a few more out there. There are still a lot of things going on I would like to capture, but the previous form is clearly not working.

So - let’s try to shake things up and see how that works!

/M

The Hitchhiker’s Guide to an Ioke Dev Env From Source (Part 5: Ioke and the REPL)

| Comments

This is the fifth part in a series of posts for non-experts about setting up an Ioke development environment on Linux. Please see the previous posts to start at the beginning:

This time we will finally get the Ioke source code, build it, and test the Ioke REPL!

Ioke

Ioke uses Git as the source code versioning tool, with a public repository set up on GitHub (soon I’ll be linking like Jeff Atwood).

So - let’s get Ioke using Git by cloning Ola’s repository:

~/bin$ cd ~/work
~/work$ git clone git://github.com/olabini/ioke
Initialized empty Git repository in /home/melwin/work/ioke/.git/
remote: Counting objects: 9221, done.
remote: Compressing objects: 100% (2941/2941), done.
remote: Total 9221 (delta 5782), reused 8656 (delta 5351)
Receiving objects: 100% (9221/9221), 45.95 MiB | 399 KiB/s, done.
Resolving deltas: 100% (5782/5782), done.

Great - let’s quickly move on to the build step:

~/work$ cd ioke
~/work/ioke$ ant
...
     [java] 2606 examples, 0 failures
jar:
      [jar] Building jar: /home/melwin/work/ioke/lib/ioke.jar

BUILD SUCCESSFUL
Total time: 22 seconds

Running just ant will execute the default target in the build.xml file. This target will make sure Ioke is compiled and the test suite is run.

At the end is a summary of the test results - if these are not all successful you might have a problem with the environment or you might have checked out a broken build from the repository.

The Ioke REPL

Now all is installed and Ioke is compiled, so let’s fire up the REPL. This is done by just running the main Ioke binary:

~/work/ioke/$ bin/ioke
iik>

When doing this we get the iik> REPL prompt. From here we can execute most Ioke code. Let’s try to print a string:

iik> "Hello World!" println
Hello World!
+> nil

iik>

Here we create a Text (Ioke’s string type) literal and send it the message println, which will cause the text to be printed to the console. The return type of println is nil (similar to null), which is printed by the REPL itself. After that we get the prompt back and can execute another line.

Let’s try a little more complex example - the factorial:

iik> fact = method(n, if(n > 1, n * fact(n pred), 1))
+> fact:method(n, if(n >(1), n *(fact(n pred)), 1))

Note how the REPL prints the method definition in a canonical form - it makes it obvious how Ioke parses the code, what are messages and what are arguments.

Let’s run our new factorial function:

iik> fact(3)
+> 6

iik> fact(10)
+> 3628800

iik> fact(50)
+> 30414093201713378043612608166064768844377641568960512000000000000

Ioke handles arbitrarily big numbers, so we don’t need to think about what fits in a certain number of bits.

The Iik REPL also comes with a simple debugger, which helps with handling conditions. For instance, let’s try to run the fact method, passing a message which doesn’t mean anything (yet):

iik> fact(f)
*** - couldn't find cell 'f' on 'Ground_0xC360E7' (Condition Error NoSuchCell)
 f                                                [<init>:1:5]
The following restarts are available:
 0: storeValue           (Store value for: f)
 1: useValue             (Use value for: f)
 2: abort                (restart: abort)
 3: quit                 (restart: quit)

 dbg:1> 1
  dbg:1:newValue> 5
  +> 5

+> 120

The above output shows that when we try to reference something that doesn’t exist we get a chance to provide that value. Here I decided to provide a value using the useValue restart and entered the value 5. This let the method continue executing and the result was printed.

To exit the REPL, just type: exit

Next up are the Emacs modes for Ioke - stay tuned!

/M

The Hitchhiker’s Guide to an Ioke Dev Env From Source (Part 4: Java+Ant)

| Comments

This is the fourth part in a series of posts for non-experts about setting up an Ioke development environment on Linux. Please see the previous posts to start at the beginning:

It took a bit longer than anticipated to get to this point, as I got side tracked with the Ioke type checking activities. But now when Ioke S is out we can continue with the series. So! We’re getting closer… Only a few more things to go.

Installing Java

As the current version of Ioke is implemented to run on a Java Virtual Machine, we need to get hold of one of those to be able to continue. The JVM brand we will install here is the latest stable one produced by Sun.

What we need is Java SE Development Kit 6u11 for Linux, Multi-language, and the the filename for this is jdk-6u11-linux-i586.bin. Note that this is not the .rpm.bin, which is also available.

Download the file from http://java.sun.com/javase/downloads/index.jsp (I’m sure you can find it) and put it in the ~/work directory.

To unpack the file, let’s make it executable and then run it:

~$ cd ~/work
~/work$ cd ~/work                   
~/work$ chmod a+x jdk-6u11-linux-i586.bin 
~/work$ ./jdk-6u11-linux-i586.bin         
... lots of legalese here...

Once the license agreement is accepted, the JVM will unpack itself into the directory ~/work/jdk1.6.0_11. Let’s move it to where we want it and add java and javac to the ~/bin directory as before:

~/work$ mv jdk1.6.0_11 ../opt
~/work$ cd ~/bin
~/bin$ ln -s ../opt/jdk1.6.0_11/bin/java
~/bin$ ln -s ../opt/jdk1.6.0_11/bin/javac

And test it:

~/bin$ java -version
java version "1.6.0_11"
Java(TM) SE Runtime Environment (build 1.6.0_11-b03)
Java HotSpot(TM) Client VM (build 11.0-b16, mixed mode, sharing)

That done - let’s move on to Ant.

Ant

Ioke uses Apache Ant to handle the build process, so to build Ioke we need to get Ant installed.

Let’s download the Ant distributable package and unpack it in one go - as we did with Git:

~/bin$ cd ~/opt
~/opt$ wget -O - http://www.apache.org/dist/ant/binaries/apache-ant-1.7.1-bin.tar.bz2 | tar xjv
</lang>

And add it to the ~/bin directory again so it's on the path:

<pre lang="sh">
~/opt$ cd ~/bin
~/bin$ ln -s ../opt/apache-ant-1.7.1/bin/ant

Let’s try it out:

~/bin$ ant -version
Apache Ant version 1.7.1 compiled on June 27 2008

Looking good!

Soon to come: How to get the Ioke source and build it.

/M

Update: Part 5: Ioke and the REPL

Type Checking in Ioke Java Methods

| Comments

Ola Bini recently issued a call to arms to help with the receiver and argument validation for Java methods in Ioke. These are the Ioke methods that are implemented in Java, instead of in Ioke itself.

The Java methods usually operate on the specific data contained within Ioke objects. This data corresponds to different Java classes, depending on what the Ioke object should hold. For instance, an Ioke List contains inside the data area a Java List. To operate on this List the Java code needs to get hold of the List reference - and it does this in a lot of cases by assuming the data object is of a certain type and casts to this type. If the data object is of a different type then a Java ClassCastException is thrown, which makes the interpreter quit.

Since Ola mailed the call to arms a number of things have happened. A few people (including myself) have volunteered to help out with adding the validation code. Additionally, a few supporting methods and additions have been added to the Ioke code base to simplify adding type checks to the existing code. And it’s these additions that I will talk about here.

Current Code

As an example what the new type validations can look like I will use the List + method that Ola also mentioned in the example.

This is the previous code from IokeList.java:

obj.registerMethod(runtime.newJavaMethod("returns a new list that contains the receivers elements and the elements of the list sent in as the argument.", new JavaMethod("+") {
        private final DefaultArgumentsDefinition ARGUMENTS = DefaultArgumentsDefinition
            .builder()
            .withRequiredPositional("otherList")
            .getArguments();
        
        @Override
        public DefaultArgumentsDefinition getArguments() {
            return ARGUMENTS;
        }
        
        @Override
        public Object activate(IokeObject method, IokeObject context, IokeObject message, Object on) throws ControlFlow {
            List<Object> args = new ArrayList<Object>();
            getArguments().getEvaluatedArguments(context, message, on, args, new HashMap<String, Object>());
            List<Object> newList = new ArrayList<Object>();
            newList.addAll(((IokeList)IokeObject.data(on)).getList());
            newList.addAll(((IokeList)IokeObject.data(args.get(0))).getList());
            return context.runtime.newList(newList, IokeObject.as(on));
        }
    }));

New Type Checks

The key to the new validation are two new classes, which extend the functionality of the normal JavaMethod class with type checking functionality. These are:

When using these to define the Java method we can “annotate” the arguments definition with types for both the arguments and the receiver. By then implementing the appropriate activate(...) the super class takes care of evaluating and validating (converting as appropriate) the receiver and arguments.

For instance, for the List + example, the above code gets changed to the following:

obj.registerMethod(runtime.newJavaMethod("returns a new list that contains the receivers elements and the elements of the list sent in as the argument.", new TypeCheckingJavaMethod("+") {
        private final TypeCheckingArgumentsDefinition ARGUMENTS = TypeCheckingArgumentsDefinition
            .builder()
            .receiverMustMimic(runtime.list)
            .withRequiredPositional("otherList").whichMustMimic(runtime.list)
            .getArguments();
        
        @Override
        public TypeCheckingArgumentsDefinition getArguments() {
            return ARGUMENTS;
        }
        
        @Override
        public Object activate(IokeObject self, Object on, List<Object> args, Map<String, Object> keywords, IokeObject context, IokeObject message) throws ControlFlow {
            List<Object> newList = new ArrayList<Object>();
            newList.addAll(((IokeList)IokeObject.data(on)).getList());
            newList.addAll(((IokeList)IokeObject.data(args.get(0))).getList());
            return context.runtime.newList(newList, IokeObject.as(on));
        }
    }));

Note that most of the boiler plate code for arguments handling (which most JavaMethods do) is removed, leaving a clean implementation of the necessary logic - to concatenate two lists in this case.

A few things are done:

  1. The JavaMethod is changed to TypeCheckingJavaMethod
  2. The arguments definition is changed to a TypeCheckingArgumentsDefinition
  3. The appropriate types are added to the arguments definition
  4. Return type of getArguments is changed to TypeCheckingArgumentsDefinition
  5. The active method is changed to the one which gets the arguments list and keywords
  6. The manual call to getArguments().getEvaluatedArguments() is removed as we now get the arguments passed

The relevant tests for this, which should be added to the list_spec.ik test file, could look like:

describe(List,
  describe("+", 
    it("should validate type of receiver",
      x = Origin mimic
      x cell("+") = List cell("+")
      fn(x + [3]) should signal(Condition Error Type IncorrectType)
    )

    it("should validate type of argument",
      fn([1,2,3] + 3) should signal(Condition Error Type IncorrectType)
    )
  )
)

So for you to do:

  1. Fork Ioke
  2. Pick a `IokeData` subclass which no one has started on yet (check with Ola/naeu/me in the IRC channel #ioke on FreeNode)
  3. Identify a method which makes faulty assumptions on receiver or arguments
  4. Add a test as per the above to validate the arguments and receiver
  5. Change `JavaMethod` implementation as per the above to fix the test
  6. Commit test and fix in togther to your fork
  7. Rinse and repeat until the whole file is done
  8. Convince Ola to pull your fork

Let’s get crackin’!

(but first - back to normal work… :)

/M

The Hitchhiker’s Guide to an Ioke Dev Env From Source (Part 3: Emacs-starter-kit)

| Comments

This is the third part in a series of posts for non-experts about setting up an Ioke development environment on Linux. Please see the previous posts to start at the beginning:

The emacs-starter-kit is a set of base configuration for Emacs. It contains a number of useful elisp libraries, with a slight focus on dynamic languages.

To install it, perform the following steps (note that we move any existing Emacs configuration out of the way first to avoid stomping what you currently have):

~/work/emacs$ cd
~$ mv .emacs.d .emacs.d.old
~$ mv .emacsrc .emacsrc.old
~$ git clone git://github.com/technomancy/emacs-starter-kit.git .emacs.d

If you now start Emacs again you’ll see that the menu bar and the toolbar is gone. This is the default in emacs-starter-kit as most Emacs users don’t find them useful. For new users the menu bar can sometimes come in handy, to get it back temporarily, just press F1.

Configuring Emacs

If you want to add your own customizations to Emacs when using emacs-starter-kit, just add an Emacs LISP file called username.el, or hostname.el, in the ~/.emacs.d directory. For instance, to make the menu bar always visible:

  1. Open Emacs, if it’s not open already.
  2. Press C-x C-f and type in: ~/.emacs.d/username.el
    Where username is the name you log in with (for instance, in my case the complete filename is melwin.el).
  3. Type in the following in the file:
     (menu-bar-mode 1)
    

    And save the file with C-x s.

  4. Now quit (C-x c) and restart and you’ll see that the menu bar is shown.

Working with Magit

emacs-starter-kit includes, among many other things, the very nice Magit Git mode for Emacs, which gives you a nice interface for working with a Git repository.

Let’s use this mode to commit our recent changes to the configuration file to our local clone of the emacs-starter-kit repository. This helps us track changes we make and also makes a backup of the file in case we screw (sorry, mess) something up.

Note 1: To move easily between Emacs windows using the keyboard, just press Shift and the arrow key pointing in the direction you want to move. Note 2: To only show the current Emacs window - press: C-x 1

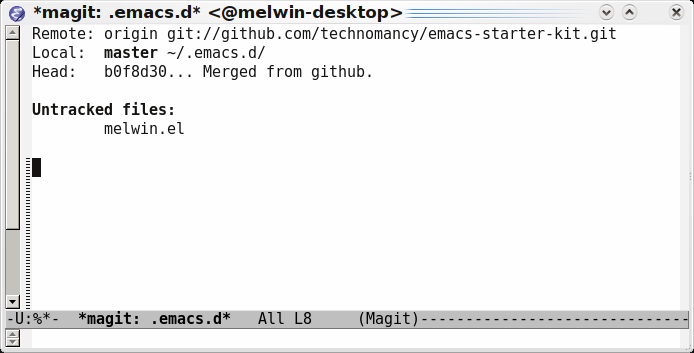
  1. Inside Emacs, press `C-x g` to run `magit-status` and enter the directory (note that `Tab` auto-completes): `~/.emacs.d`
    Emacs magit-status
  2. Put the cursor over the `username.el` in the list of `Untracked files`.
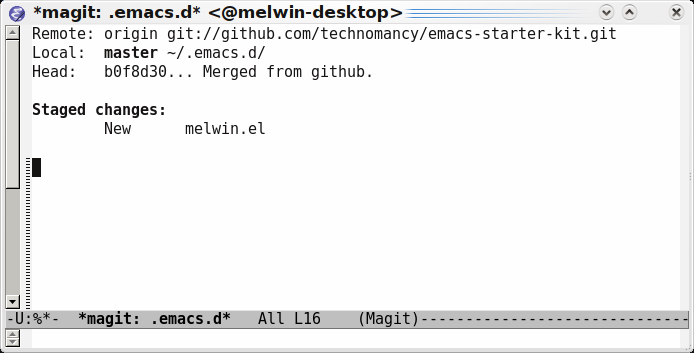
  3. Press `s` to Stage the new file - this adds the file to the Git staging area, from which all files are committed.
    Emacs magit-status staged
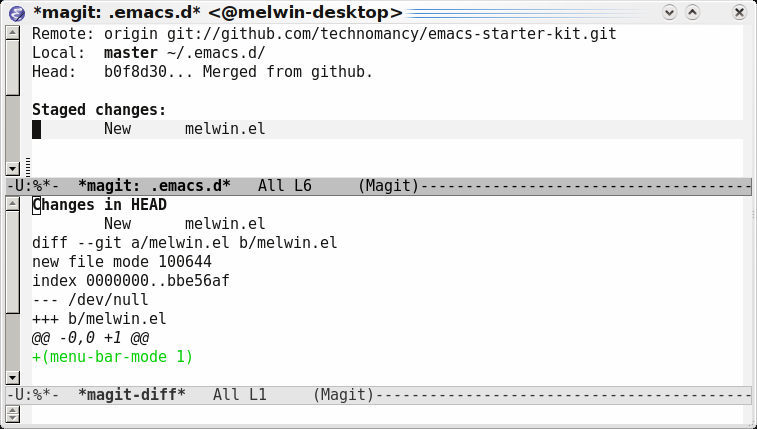
  4. Press `d` and then accept to diff against HEAD - this will show you a diff view of the changes we have staged - just the add of a single file.
    Emacs magit-status diff
  5. Press `c` to perform the commit. This opens a new buffer into which a commit message can be added.
  6. Write something like: `Add personal configuration file.`
  7. Now press `C-c C-c` to commit the file.

That’s it - now the change has been committed to the local clone of the emacs-starter-kit Git repository.

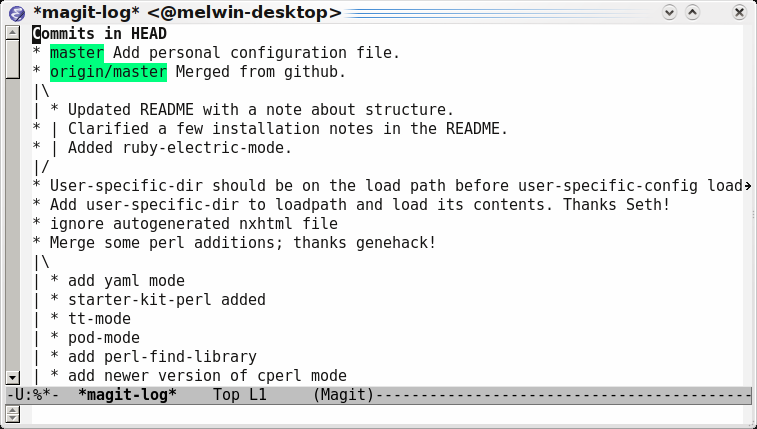
To see the log of all commits, press l (lowercase L) in the magit-status buffer:
Emacs magit-status log

To look at a certain commit - just press Enter on it and a view of the diff will be shown. This makes it quite easy to browse through commits in a repository. At the top of the log is the most recent commit, which in this case is the file we just added.

To update emacs-starter-kit with the latest changes in the GitHub repository, just press F in the magit-status buffer or run git pull in the ~/.emacs.d directory.

Summary

Now that we have Git and Emacs set up we can finally move to Ioke. In the next post we’ll go through installing the latest Java JDK and getting and compiling the Ioke source code.

Join me then!

/M

Update: Part 4: Java and Ant

The Hitchhiker’s Guide to an Ioke Dev Env From Source (Part 2: Emacs)

| Comments

This is the second part in a series of posts for non-experts about setting up an Ioke development environment on Linux. Please see the previous post to start at the beginning:

In this post we will install GNU Emacs from source and also get a basic configuration set up using the emacs-starter-kit.

If you already have Emacs installed and have an old configuration laying around you probably want to make a backup of this before following the below instructions. This post assumes that there is no Emacs installed and that the user doesn’t have any Emacs configuration in the home directory.

Installing Emacs

Git is an efficient Distributed Version Control System. Although the primary VCS for Emacs is still CVS - and it looks like they are moving towards Bazaar - we’ll get the Emacs sources from the Emacs Git mirror. We want to be cool, right?

~$ cd work
~/work$ git clone --depth 1 git://git.sv.gnu.org/emacs.git
Initialized empty Git repository in /home/melwin/work/emacs/.git/
remote: Counting objects: 46400, done.
remote: Compressing objects: 100% (24410/24410), done.
remote: Total 46400 (delta 41204), reused 25501 (delta 21836)
Receiving objects: 100% (46400/46400), 74.38 MiB | 213 KiB/s, done.
Resolving deltas: 100% (41204/41204), done.
Checking out files: 100% (2837/2837), done.

With the --depth 1 parameter we limit the history so that we only get the latest version of the files - in this case we’re not interested in the full history.

Note: As we’re getting the bleeding edge source code of Emacs, it could happen that the build is broken. I’ve never had this happen on me, but in case you get strange errors when building Emacs, this might be the reason. Usually such problems are fixed quickly, so try to do a git pull a bit later to update the downloaded source.

Previously, to get fun things like multi-tty support and smooth fonts, we had to get specific feature branches of Emacs. Nowadays, however, all the things we want are merged into the Emacs master branch. Before building, the only thing we need to do is to make sure the necessary development libraries are installed. In case you wonder how I came up with this list: the good ol’ method of trial and error. I simply ran the configure command and checked the error messages. This helped me identify the needed libraries. Now you can reap the benefits by just doing the following:

~/work$ sudo apt-get install libgtk2.0-dev libxpm-dev libjpeg-dev libgif-dev libtiff-dev
...

… and then run the classical configure, make and make install:

~/work$ cd emacs
~/work/emacs$ ./configure --prefix=$HOME/opt/emacs-23.0.60
...
~/work/emacs$ make
...
~/work/emacs$ make install
...

Phew. That burned som CPU cycles…! Once done - let’s add it to our bin directory, just as we did with Git.

~/work/emacs$ cd ~/bin
~/bin$ ln -s ../opt/emacs-23.0.60/bin/emacs
~/bin$ ln -s ../opt/emacs-23.0.60/bin/emacsclient
~/bin$ ls
emacs  emacsclient  git

Time to test. Just run emacs:

~/bin% emacs

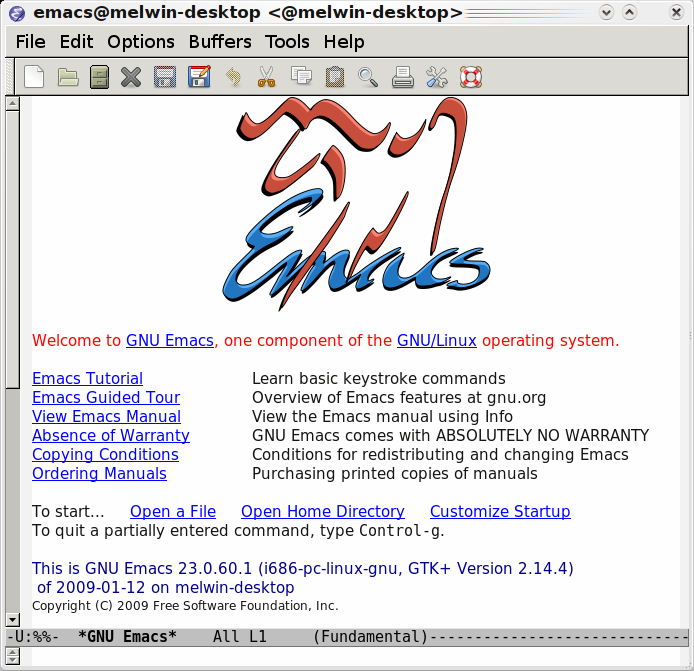
This should show you an Emacs window with a pretty(?) GNU.

Emacs Window

If you’re completely new to Emacs, this might be a good opportunity to run the Emacs tutorial. Emacs is a self-documenting editor, which means that most things that you might want to learn about Emacs can be found inside the editor itself - including information about internal functions and libraries.

To run the tutorial, just press Ctrl+h t (that is, control and h, release control, then press t), or, in Emacs lingo, C-h t (which is the convention I’ll use from now on).

Once you’ve learned enough (you did complete the whole thing, right?), just quit using C-x c.

Note: To update the source code and rebuild, do a git pull in the emacs directory, then make distclean (in case some build files changed) and then perform the compile and installation as per the above again.

Next up is emacs-starter-kit to get more functionality in Emacs and a decent default configuration to help us get going - stay tuned!

/M

Update: Part 3: emacs-starter-kit

The Hitchhiker’s Guide to an Ioke Dev Env From Source (Part 1: Git)

| Comments

In this series of posts I will guide you, the humble reader, through the install procedure to get a development environment for Ioke up and running. All the cool kids want to develop in Ioke nowadays, so let’s make you can as well!

The components we will be installing are:

These instructions are written for a non-expert who might not have too much experience with compiling things, using Git or Emacs. If you’re an expert you will find nothing new or exciting here! The environment I use is a freshly installed Kubuntu Intrepid Ibex box, although most of it should be similar, if not identical, to other Ubuntu/Debian based distributions.

The components listed above will all be installed manually - not using the package system. This is to allow us to get the freshest versions of what we need without depending on the packages in the distribution to be updated (or hunted down in alternative repositories). The only thing we will install from the distribution are the compilers, tools and development libraries used to compile the software.

Why do we not use the package system? Well, that’s a valid question. Most of the above can be installed from packages in custom repositories. It’s simple and convenient. However here we will not use if for two reasons:

  1. If packages are used we will depend on the repositories to be updated to use the latest version of some software, which can be annoying if we want to develop on the bleeding edge.
  2. It’s good to know how to compile things yourself - so by not using prepared packages we might learn something!

To keep control over our custom built software we’ll install it in dedicated directories under $HOME/opt instead of in the normal locations like /usr/bin. This allows us to get everything installed without needing root access (except to install the compilers etc from the distribution).

First Step

Don’t Panic!

Always sound advice to start with - especially if you are hitchhiking. I’m going to try to cover each step in detail, but if you think something is unclear - just leave a comment and I’ll try to clarify. So - grab your towel and let’s get going!

Install Git

For Emacs, emacs-starter-kit and Ioke we will use Git to retrieve the sources. Therefore the first thing we need to install is Git.

In the command line instructions below, all lines prefixed by the prompt &lt;dir&gt;$ are commands to be typed in. The rest are output or my comments.

Open a terminal window and create a new work directory under your home using the following instructions. In this directory we will work with downloaded source files and build the software.

~$ mkdir ~/work
~/work$ cd ~/work
~/work$ wget -O - http://kernel.org/pub/software/scm/git/git-1.6.1.tar.bz2 | tar xjv
... many lines...

The last command downloads the git source package and expands it in one go by piping it directly from wget to tar, which is told to expand it using bz2 with the j parameter. This is a convenient way to get packages off the net and unpacked, especially when there is no need to keep the package itself around.

The result is that we now have a git-1.6.1 directory in the work directory. Let’s see how we compile it:

~/work$ cd git-1.6.1/
~/work/git-1.6.1$ head INSTALL

                Git installation

Normally you can just do "make" followed by "make install", and that
will install the git programs in your own ~/bin/ directory.  If you want
to do a global install, you can do

        $ make prefix=/usr all doc info ;# as yourself
        # make prefix=/usr install install-doc install-html install-info ;# as root

~/work/git-1.6.1$

So - two commands. Simple enough! However, before we compile - we need to make sure all the relevant packages are installed:

~/work/git-1.6.1$ sudo apt-get install libcurl4-openssl-dev zlib1g-dev libexpat-dev tk8.5 asciidoc docbook2x

Depending on your internet connection, this could take quite a while, as we need to download the texlive distribution, among other things, to build all of the Git documentation. This is not strictly necessary, but here we’ll just do it for completeness’ sake.

Let’s build git and make sure it’s installed under our $HOME/opt directory as we said in the beginning:

~/work/git-1.6.1$ make prefix=~/opt/git-1.6.1 all doc info
... lots of lines...

Compiling Git will take some time as well. Go get a coffee (or perhaps a Pan Galactic Gargle Blaster - sweet like nectar).

Once the compile is done - install it. Note that we don’t need to do this as root as we’re installing under the user home directory:

~/work/git-1.6.1$ make prefix=~/opt/git-1.6.1 install install-doc install-html install-info

Let’s add it to the user’s path by linking it into the private bin directory. This depends on the standard Ubuntu bash shell profile script which adds ~/bin to the PATH variable. If a different shell is used you need to perform the appropriate steps yourself.

~/work/git-1.6.1$ mkdir ~/bin
~/work/git-1.6.1$ cd !$
~/bin$ ln -s ../opt/git-1.6.1/bin/git

Now close the shell/terminal, open a new one - and try the git command:

~$ git --version
git version 1.6.1

If you get the above output - great! You’re don! Sit back and relax for a bit before moving on to the next section.

However, if you don’t get the version output, but instead see the following message, review the previous instructions and make sure it works ok before continuing.

#INCORRECT OUTPUT - SOMETHING WAS MISSED!
#GO BACK AND REVIEW
~$ git                                                                                                                                                                                        
The program 'git' is currently not installed.  You can install it by typing:                                                                                                                  
sudo apt-get install git-core                                                                                                                                                                 
-bash: git: command not found

If you still can’t get it to work - drop me a comment!

Git in 30 Seconds

There are loads of good Git tutorials and information. You can find several on the official Git page and at GitHub (go sign up if you haven’t already, and fork me!).

Here is a quick run through of a few common Git commands you could try out with your freshly brewed cup of Git:

~$ cd
~$ mkdir gittest
~$ cd gittest/
~/gittest$ git init
Initialized empty Git repository in /home/melwin/gittest/.git/
~/gittest$ echo Test file! > test.txt
~/gittest$ git add test.txt
~/gittest$ git commit -m "Initial import."
[master (root-commit)]: created 79c091d: "Initial import."
 1 files changed, 1 insertions(+), 0 deletions(-)
 create mode 100644 test.txt
~/gittest$ echo Add line. >> test.txt
~/gittest$ git diff test.txt
diff --git a/test.txt b/test.txt
index 1cbaf90..3746f9e 100644
--- a/test.txt
+++ b/test.txt
@@ -1 +1,2 @@
 Test file!
+Add line.
~/gittest$ git commit -a -m "Add new line."
[master]: created b20f9a4: "Add new line."
 1 files changed, 1 insertions(+), 0 deletions(-)

If you can follow the above - great! First part finished. Next up is to install GNU Emacs from source and the emacs-starter-kit, which provides a decent default a set of configuration for Emacs.

Stay tuned!

/M

Update: Part 2: Emacs